Pages

Wednesday, February 19, 2014

I/D# 1: Unit N Concept 7: The Unit Circle

  • INQUIRY ACTIVITY SUMMARY
                 1.        Describe the 30* triangle:
                                  
                  The first thing I did was label the triangle according to the Special Right Triangle. The hypotenuse was labeled as 2x, the horizontal side x rad3, and the vertical x.  Next we had to simplify the hypotenuse to make it one. In order to do that we had to divide all three sides by 2x. As seen in the picture above we can see that when we divided x by 2x the x's canceled and it became 1/2. For the horizontal side the x's also canceled and it simplified to rad 3/2.  Afterwards, I labeled the hypotenuse r, the horizontal value x, and the vertical value y. Then I drew a coordinate plane. We began by making the labeled angle side the origin (0,0). Then near the 90 angle I labeled it as ( rad3/2,0) because we moved rad 3/2 on the x axis and we didn't move any units up. The top vertices is labeled as ( rad3 /2,1/2) because we moved right rad3/2 and up 1/2.
                2. Describe the 45* Triangle:


               The first thing I did was label the triangle using the rules of Special Right Triangle. For this triangle the hypotenuse is x rad 2 and the horizontal and vertical side are both x. Then we had to make the hypotenuse 1. In order to do this we had to divided xrad2 by xrad2(hypotenuse) to obtain an answer of one. Then I have to divide the two other sides by xrad2 and since both are x, when we divide by xrad2, we get rad2/2. However, sine there is a square root in the bottom we had to simplify. The next step was to label the hypotenuse r, the horizontal value x and the vertical value y. Afterwards we also had to draw a coordinate plane. We also labeled the origin at the given labeled angle (0,0). As showed in the second triangle, we labeled the 90* vertex (rad2/2,0) because we moved rad2/2 along the x- axis and 0 unit along the y axis. Finally for the top vertex the point would be (rad2/2,rad2/2 because we moved along the x and y axis rad2/2. 

               3.  Describe the 60* triangle:


                  This is very similar to the 30* triangle but for the 60* triangle the sides are switched. The hypotenuse still being 2x, the vertical side x radical 3, and the horizontal side as x. We first divide everything by 2x and we get a vertical side of radical 3/2, a horizontal side of 1/2, and hypotenuse of one (just like the 30* angle and after simplifying).Next we place the triangle on the first quadrant giving us ordered pairs of (1/2, radical 3\2), (1/2,0), and (0,0). 
 
            4. This activity helps me derive the unit circle because it gives me the degrees, points, and ordered pairs that are located at quadrant one of the unit circle. These three triangles are important because there reflected on the unit circle. The vertices on the top are the points used all around the circle but they have different x and y values. ( explained below)


             5.  The 30*,45*,and 60* triangles that we did in the activity lie on the first quadrant. Since the first quadrant is reflected on the second quadrant, the second is reflected on the third quadrant,  and the third on the fourth quadrant. The values of the vertices change. In the first quadrant both values are positive, in the second quadrant the x value is negative. In the third quadrant the values of both the x and y are negative. For the fourth quadrant the y value is negative.
 
INQUIRY ACTIVITY REFLECTION

The coolest thing I learned from this activity was how the triangles even when shifted to different quadrants are the same as the first quadrant.
 
This activity will help me in this unit because with just knowing the ordered pairs from these three triangles, I can easily narrow down the answers for degrees that have the share reference angles.
Something I never realized before about special right triangles and the unit circle is that I can see the unit circle as triangle to find the vertices.


Sunday, February 9, 2014

RWA# 1: Unit M Concept 5: Graphing Ellipses Given Equations and Defining All Parts

1. Definition:The set of all points such that the sum of the distance of two points known as the foci is a constant. (Mrs. Kirch).

2.


                                        .


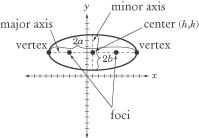
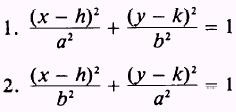
                   An ellipse usually looks like a squished circle.  The equation for an ellipse is shown above. The ellipse consist of a center, major axis, minor axis, vertices, co-vertices,and foci. The center is a point inside the ellipse.
                  We can find the center by h,k. If we look at the equation we'll see that h will always go with x and y will always go with k. But we have to make sure we put it in h,k format. The major and minor axis intersect and go through the center. To find  if the major axis  is horizontal or vertical , we have to look at the standard form of the equation. It will be horizontal if the larger denominator is under the x^2 term and this means the ellipse will be fat. If  the larger term is under the y^2 the major axis will vertical and skinny. The major axis can be demonstrated on the graph with a solid line and the minor with a dashed line. The vertex is two points at the end of the major axis. They can be found by it being "a" distance from a to the center. The two co-vertices are the end points of the minor axis. The co-vertices can be found by it being "b" distance from the ellipse. You count from the center.  To plot the foci you must plot c units to the left/ right if x^2 has the larger value below  it. Move and plot c units up/down if y^2 has the bigger number under it. To find any values for a, b, or c that aren't given use the formula a^2-b^2=c^2.  Eccentricity must be between 0 and 1.  This can be found  by dividing c over a and rounding it three decimal places. For more information look at this website. (http://www.mathsisfun.com/geometry/ellipse.html)

3. Real World Application


             Ellipses can be seen in our solar systems.. Although some objects follow circular orbits, most orbits are shaped more like "stretched out" circles or ovals.(http://www.windows2universe.org) Since the orbit of Earth around the Sun is very circular the eccentricity is very close to one. Like we can see in the video the foci of the solar system lies in the sun.
           All planets have a different distance from the center because the planets are all spread around and not in a straight line. If we take a look  the earth and the sun we can see that since the foci are together the and that is the reason why the Earth seems to revolve in a circle around the sun. The actual eccentricity is .0167. The major axis in the solar system would be the from the Earth to the sun and that same distance to the left/right.
        

4. References: